10 Ekim 2024 Perşembe

NetBackup | MS SQL Server instances disappear from SQL Intelligent Policy

Problem

MS SQL Server instances disappear from SQL Intelligent Policy and previously discovered Availability Groups (AG) in NetBackup.

Cause

There is a mismatch in the following values:

- The output of the query SELECT @@SERVERNAME from SQL Management Studio.

- The Value in the Windows Registry under \HKEY_LOCAL_MACHINE\SOFTWARE\Microsoft\Microsoft SQL Server\X\Machines\OriginalMachineName 

Discovering AGs and instances involves both non-credential discovery and credential discovery. When NetBackup is not authenticated to connect to the SQL server, OriginalMachineName from the Windows Registry is collected by non-credential discovery as a source of the information for AGs or instances. Once connected, the information obtained from SQL Server will also be used. The conflict between these pieces of information will lead to a cycle of source information changing, which results in the issue of the AGs disappearing from NetBackup. 

This mismatch could be attributed to multiple factors. One to be considered is the cloning and deploying of VMs containing previously configured SQL Servers.

Solution

  • Compare the following values in the client. 

           The output of the query SELECT @@SERVERNAME from SQL Management Studio.

           The Value from the Registry under \HKEY_LOCAL_MACHINE\SOFTWARE\Microsoft\Microsoft SQL Server\X\Machines\OriginalMachineName 

           If the values above do not match, then rename one of those to make them match based on the preferred naming convention used in your organization. 

  • Restart NetBackup Services on the SQL client. 

  • Register Instance Name using the same name selected for the Registry keys 

https://www.veritas.com/content/support/en_US/article.100067428
26 Eylül 2024 Perşembe

How to Uninstall SafeNet Authentication Service Agent

SafeNet Authentication Service Agent uygulamasını kaldırılması gerektiğinde aşağıdaki yöntemi kullanabiliriz.

SafeNet Authentication Service Agent'ı kaldırmak için aşağıdaki komutu kullan: 


msiexec /x {PRODUCT-CODE} 


{PRODUCT-CODE} kısmına SafeNet Authentication Service Agent'ın ürün kodunu yazmalısın. Ürün kodunu bulmak için kayıt defterine bakabilirsin:


regedit (Kayıt Defteri Düzenleyicisi) aç.
HKEY_LOCAL_MACHINE\SOFTWARE\Microsoft\Windows\CurrentVersion\Uninstall yolunu takip et.
Burada SafeNet Authentication Service Agent ile ilgili anahtarı bul ve ürün kodunu kopyala.


Örnek: msiexec /x {523727B0-D5D5-4392-935B-BFEAA70F29A6}

24 Mayıs 2024 Cuma

HSM Komutlar

hsmstate              HSM sistemlerin durumları

ctkmu l                HSM üzerindeki slotlar

ctconf -v -a0     a0 sisteminin bilgileri

ctconf -v -a1     a1 sisteminin bilgileri

ctkmu l -s11        slot11 içeriği


HSM sisteminde slot oluşturma, initialize işlemi ve replikasyonu

1. to create new slot on a1:  ctconf -c1 -a1

2. to initialize the slot:      ctkmu t -s<slot number>

3. to replicate:                 ctkmu rt –s<source> –d<destination>


HSM sisteminde fw update

ctconf -g   621-000097-003_PSIE2_V5.00.02.fw     örnek fw dosya adı

https://thalesdocs.com/gphsm/ptk/5.9/docs/Content/PTK-C_Admin/CLI_Ref/cmd_line_util_ref.htm

9 Aralık 2023 Cumartesi

VMware / Reset ESXi Root Password with Host Profile

1. Login to the vCenter WebClient

2. Go to Home and then choose Host Profiles from Operations and Policies Section.

3. Choose > Extract profile from a host.

4. In the Extract Host Profile menu wizard > Select the host you want to update the password for.

5. Name the Host Profile and click Next and then Finish to complete the capture of the host profile template.

 - The new host profile should appear on the Host Profile Objects Field.


6. Right Click the new Host Profile or using the Actions menu choose > Edit Settings

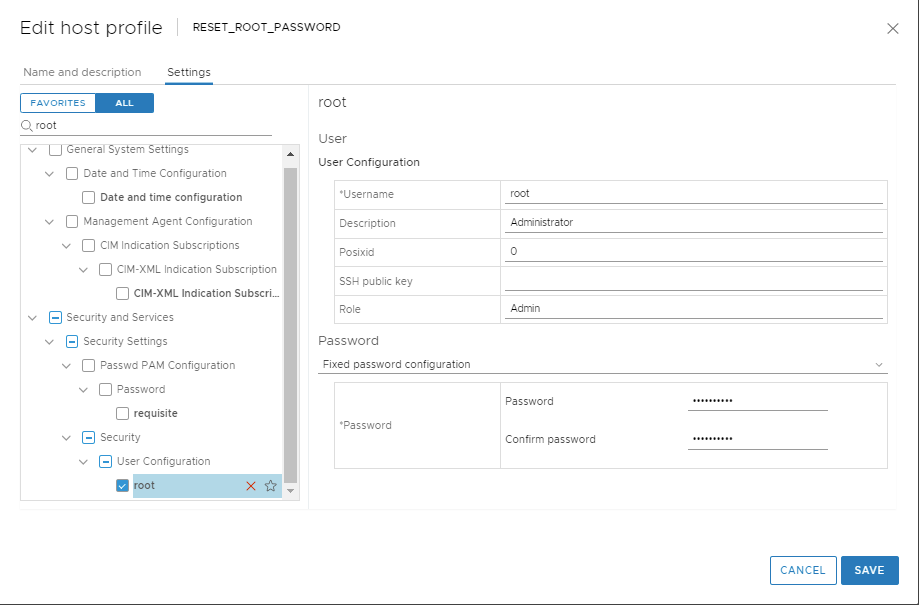
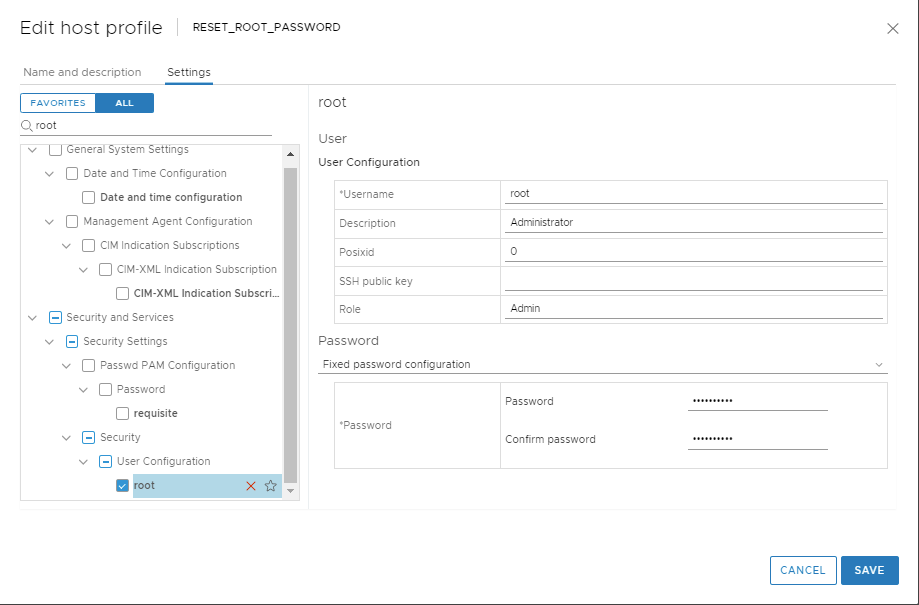
7. In the 'Edit Host Profile' Wizard. Uncheck all boxes.

8. Then using the search filter search for > root

9. Highlight and then select the check box for > root

10. A configurable window will display the root User configuration.

11. At the Password subsection, choose > Fixed password configuration

12. Here you will fill in the new password and confirm it before proceeding.

13. Double check that all other non applicable boxes have no check marks and proceed to Finish .

14. Once the Task Completes highlight the new host profile and from the 'Actions' drop down menu choose > Attach Detach Hosts and Clusters > then Select the host in the wizard.

15. From the Action Menu select Check Host Compliance.

16.  From the Action Menu select Remediate

17. Then Check Host Compliance.

18. Remove the Host Profile from the Host.

- At this time the host password should be successfully upgraded.

https://kb.vmware.com/s/article/68079

VMware / vmfsfilelockinfo

VMware üzerinde lock durumda olan bir sanal makine ya da dosyanın hangi host üzerinde lock durumda olduğunu ve detaylarını aşağıdaki örnek komut ile sorgulayabiliriz.

[root@esxihost:~] vmfsfilelockinfo -p "/vmfs/volumes/ESXI05/VMware vCenter Server 20395099/VMware vCenter Server 20395099.vmx.lck"

vmfsfilelockinfo Version 2.0

Looking for lock owners on "VMware vCenter Server 20395099.vmx.lck"

"VMware vCenter Server 20395099.vmx.lck" is locked in Exclusive mode by host having mac address ['6c:0b:84:b7:f6                                 :e2']

Trying to use information from VMFS Heartbeat


Host owning the lock on file is 92.68.10.26, lockMode : Exclusive

Total time taken : 5.400021321999986 seconds.

Raporları oluşturmak için Flex üzerindeki master server'a PuTTY üzerinden appadmin ile giriş yapın ve "sudo -i" ile root kulla...