VMware etiketine sahip kayıtlar gösteriliyor. Tüm kayıtları göster

9 Aralık 2023 Cumartesi

VMware / Reset ESXi Root Password with Host Profile

1. Login to the vCenter WebClient

2. Go to Home and then choose Host Profiles from Operations and Policies Section.

3. Choose > Extract profile from a host.

4. In the Extract Host Profile menu wizard > Select the host you want to update the password for.

5. Name the Host Profile and click Next and then Finish to complete the capture of the host profile template.

 - The new host profile should appear on the Host Profile Objects Field.


6. Right Click the new Host Profile or using the Actions menu choose > Edit Settings

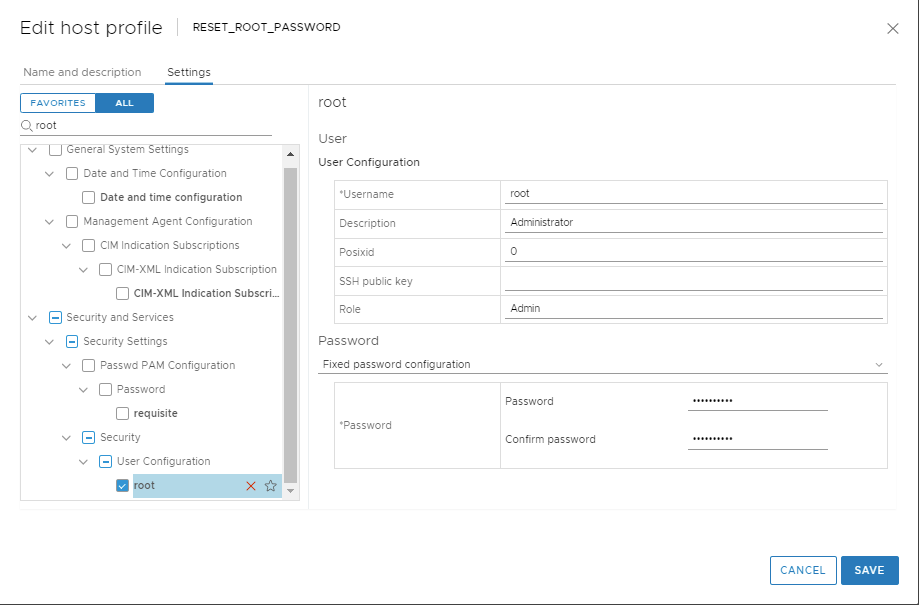
7. In the 'Edit Host Profile' Wizard. Uncheck all boxes.

8. Then using the search filter search for > root

9. Highlight and then select the check box for > root

10. A configurable window will display the root User configuration.

11. At the Password subsection, choose > Fixed password configuration

12. Here you will fill in the new password and confirm it before proceeding.

13. Double check that all other non applicable boxes have no check marks and proceed to Finish .

14. Once the Task Completes highlight the new host profile and from the 'Actions' drop down menu choose > Attach Detach Hosts and Clusters > then Select the host in the wizard.

15. From the Action Menu select Check Host Compliance.

16.  From the Action Menu select Remediate

17. Then Check Host Compliance.

18. Remove the Host Profile from the Host.

- At this time the host password should be successfully upgraded.

https://kb.vmware.com/s/article/68079
VMware / vmfsfilelockinfo

VMware üzerinde lock durumda olan bir sanal makine ya da dosyanın hangi host üzerinde lock durumda olduğunu ve detaylarını aşağıdaki örnek komut ile sorgulayabiliriz.

[root@esxihost:~] vmfsfilelockinfo -p "/vmfs/volumes/ESXI05/VMware vCenter Server 20395099/VMware vCenter Server 20395099.vmx.lck"

vmfsfilelockinfo Version 2.0

Looking for lock owners on "VMware vCenter Server 20395099.vmx.lck"

"VMware vCenter Server 20395099.vmx.lck" is locked in Exclusive mode by host having mac address ['6c:0b:84:b7:f6                                 :e2']

Trying to use information from VMFS Heartbeat


Host owning the lock on file is 92.68.10.26, lockMode : Exclusive

Total time taken : 5.400021321999986 seconds.

19 Ekim 2022 Çarşamba

VMware / msg.snapshot.error-NOTFOUND

 Sanal makine üzerinde snapshot alınmak istediğinde aşağıdaki hata ile karşılaşılabilir.

Bu durumda sanal makinenin bulunduğu klasör içerisindeki dosyalar kontrol edilebilir. 
Varsa delta isminde dosyalar silinerek snapshot alınma sorunu çözülebilir.

An error occurred while taking a snapshot: msg.snapshot.error-NOTFOUND.
An error occurred while saving a snapshot: msg.snapshot.error-NOTFOUND.


7 Ocak 2020 Salı

VMware / Windows Server 2012 R2 - Access is denied

Windows Server 2012 R2 çalışan sistemde Access is denied hatası ile karşılaşıldığında.


Çözüm için linkte belirtilen düzenleme uygulanabilir.  https://kb.vmware.com/s/article/1012225
  1. Power off the virtual machine.
  2. Right-click the virtual machine and select Edit Settings.
  3. Click the VM Options tab.
  4. Click Advanced > Edit Configuration > Add Row.
  5. Insert a new row with the name devices.hotplug and a value of false.
  6. Power on the virtual machine.

24 Aralık 2019 Salı

VMware / Unable to passthrough a USB smart card reader to a guest operating system in ESXi version 6.5 and later

ESXi üzerinde usb token kullanmak istediğimizde aşağıdaki hata mesajı ile karşılaşabiliriz.


Status: Cannot connect 'path:0/1/0/1' to this virtual machine. The device was not found.


USB aygıtı kullanabilmek için sanal makine kapalı iken .vmx dosyasına aşağıddaki satır eklenmeli.

  • Power of the VM
  • Append the following line to your VM configuration (.vmx)
    usb.generic.allowCCID = "TRUE"
Düzenleme sonrası sanal makine ayarlarının değiştirilmesi bu değişikliğin ezilmesine sebep olabilir.

Aynı ayarları sanal makine üzerinden de yapabiliriz.


21 Kasım 2019 Perşembe

VMware/ Disable VSS application quiescing using VMware Tools

  1. Open the C:\ProgramData\VMware\VMware Tools\Tools.conf file using a text editor.
  2. Create the file if it does not exist in the above said location
  3. Add these entries to the file:

    [vmbackup]
    vss.disableAppQuiescing = true

     
  4. Save and close the file.
  5. Restart the VMware Tools Service.
    1. Click Start > Run, type services.msc, and click OK.
    2. Right-click the VMware Tools Service and click Restart.

18 Nisan 2018 Çarşamba

VMware / upgrade the vSphere Replication appliance

Upgrade the vSphere Replication appliance by using a downloadable ISO image

Prerequisites
  • Upgrade the vCenter Server instance that vSphere Replication extends.
  • Download the  VMware-vSphere_Replication-6.5.x.x-build_number.iso image from the vSphere Downloads page. Copy the ISO image file to a datastore that is accessible from the vCenter Server instance that you use with vSphere Replication.
  • If the vSphere Replication version that you run is not supported for direct upgrade to vSphere Replication 6.5, upgrade your vSphere Replication instance to a supported version. For example, to upgrade vSphere Replication 5.5 to 6.5, you must first upgrade 5.5 to 5.8.0.2, and then upgrade 5.8.0.2 to 6.1. See the interoperability matrix at http://www.vmware.com/resources/compatibility/sim/interop_matrix.php for solution upgrade paths for vSphere Replication.
  • Shut down and power off the vSphere Replication virtual machine.
Procedure
  1. Right-click the vSphere Replication virtual machine and select Edit Settings.
  2. If you are upgrading a vSphere Replication Server appliance, reconfigure the virtual machine to increase its memory from 512 MB to 716 MB RAM.
  3. On the Virtual Hardware tab, select CD/DVD Drive > Datastore ISO File.
  4. Navigate to the ISO image in the datastore.
  5. For File Type, select ISO Image and click OK.
  6. Select the option to connect at power on and follow the prompts to add the CD/DVD drive to the vSphere Replication virtual machine.
  7. Power on the vSphere Replication virtual machine.
  8. In a Web browser, log in to the virtual appliance management interface (VAMI).
The URL for the VAMI is https://vr_appliance_address:5480.
  1. Click the Update tab.
  2. Click Settings, select Use CDROM Updates, and click Save Settings.
  3. Click Status and click Check Updates.
The appliance version appears in the list of available updates.
  1. Click Install Updates and click OK.


  1. After the updates install, click the System tab and click Reboot.
  2. After the appliance reboots, start the console of the vSphere Replication virtual machine to monitor the process.
The vSphere Replication appliance reboots two more times for the upgrade procedure to complete.
  1. After the vSphere Replication appliance reboots, log in to the VAMI and repeat the steps to register the vSphere Replication appliance with vCenter Single Sign-On.
This registers the vSphere Replication appliance in the Lookup Service and SSO or updates an existing vSphere Replication registration.
  1. Log out of the vSphere Web Client, clear the browser cache, and log in again to see the upgraded appliance.

VMware / reset root password of vSphere Replication

Reset the root password of vSphere Replication appliance 6.5 (2150038)

Reboot the vSphere Replication appliance.In the Grub screen, press e to edit the current kernel parameters.
Use arrow key to scroll down to this line:
linux /vmlinuz-3.12.62-60 ......... . . . . . . silent quiet showopts
Add this line at the end:   init=/bin/bashExample: linux /vmlinuz-3.12.62-60 ..... . . . . . . silent quiet showopts init=/bin/bash"


Press F10 to reboot and vSphere replication appliance will reboot at run level 1.
Mount root filesystem as read write by running this command: mount -o remount,rw /
Run this command to reset the root password: passwd rootAfter the password is reset, reboot the appliance.

Note: If you do not mount root (/) directory as read write (rw) you will receive this error:
passwd: Authentication token manipulation errorpasswd: password unchanged

10 Şubat 2017 Cuma

Unregister vSphere Replication from vCenter Server if the Appliance Was Deleted

Unregister vSphere Replication from vCenter Server if the Appliance Was Deleted

If the vSphere Replication appliance virtual machine does not exist because it was deleted, you cannot use the virtual appliance management interface (VAMI) to unregister vSphere Replication from vCenter Server. Instead, you can use the Managed Object Browser (MOB) to delete the vSphere Replication extension.

Prerequisites

Log in to https://<vCenter_Server_address>/mob/?moid=ExtensionManager with vCenter Server credentials.

Procedure

  1. In the extensionList property, click the corresponding link for the com.vmware.vcHms extension key to check the key details.
  2. Verify that the displayed data is for a vSphere Replication appliance that is already lost.
  3. In ExtensionManager, click unregisterExtension.
  4. Type com.vmware.vcHms for the extension key value, and click Invoke Method.
  5. Verify that the result displays void and not an error message.

An error message might appear if the specified extension is not registered, or if an unexpected runtime error occurs.
     
     6.Close the window.
   
     7. Refresh the ExtensionManager page and verify that the extensionList entry does not include com.vmware.vcHms.

https://pubs.vmware.com/srm-55/index.jsp#com.vmware.srm.install_config.doc/GUID-8110B494-53FC-4B82-8953-1C3E57933909.html


28 Nisan 2016 Perşembe

How to Change hostname in a VMware vRealize Operations Manager vApp

  1. Log into the node as root.
  2. Update the hostname by running this command:

    $VMWARE_PYTHON_BIN /usr/lib/vmware-vcopssuite/utilities/bin/sethostname.py NewHostName
    Where NewHostName is the hostname you want to use.
  3. Restart the node.

10 Kasım 2015 Salı

VMware - Hardware Features Available with Virtual Machine Compatibility Settings

The virtual machine compatibility setting determines the virtual hardware available to the virtual machine, which corresponds to the physical hardware available on the host. You can review and compare the hardware available for different compatibility levels to help you determine whether to upgrade the virtual machines in your environment.


Supported Features for Virtual Machine Compatibility
Feature
ESXi 6.0 and later
ESXi 5.5 and later
ESXi 5.1 and later
ESXi 5.0 and later
ESX/ESXi 4.x and later
ESX/ESXi 3.5 and later
Hardware version
11
10
9
8
7
4
Maximum memory (GB)
4080
1011
1011
1011
255
64
Maximum number of logical processors
128
64
64
32
8
4
Maximum number of cores (virtual CPUs) per socket
128
64
64
32
8
1
Maximum SCSI adapters
4
4
4
4
4
4
Bus Logic adapters
Y
Y
Y
Y
Y
Y
LSI Logic adapters
Y
Y
Y
Y
Y
Y
LSI Logic SAS adapters
Y
Y
Y
Y
Y
N
VMware Paravirtual controllers
Y
Y
Y
Y
Y
N
SATA controllers
4
4
N
N
N
N
Virtual SCSI disk
Y
Y
Y
Y
Y
Y
SCSI passthrough
Y
Y
Y
Y
Y
Y
SCSI hot plug support
Y
Y
Y
Y
Y
Y
IDE nodes
Y
Y
Y
Y
Y
Y
Virtual IDE disk
Y
Y
Y
Y
Y
N
Virtual IDE CD-ROMs
Y
Y
Y
Y
Y
Y
IDE hot plug support
N
N
N
N
N
N
Maximum NICs
10
10
10
10
10
4
PCNet32
Y
Y
Y
Y
Y
Y
VMXNet
Y
Y
Y
Y
Y
Y
VMXNet2
Y
Y
Y
Y
Y
Y
VMXNet3
Y
Y
Y
Y
Y
N
E1000
Y
Y
Y
Y
Y
Y
E1000e
Y
Y
Y
Y
N
N
USB 1.x and 2.0
Y
Y
Y
Y
Y
N
USB 3.0
Y
Y
Y
Y
N
N
Maximum video memory (MB)
2 GB
512
512
128
128
128
SVGA displays
10
10
10
10
10
1
SVGA 3D hardware acceleration
Y
Y
Y
Y
N
N
VMCI
Y
Y
Y
Y
Y
N
PCI passthrough
16
6
6
6
6
0
PCI Hot plug support
Y
Y
Y
Y
Y
N
Nested HV support
Y
Y
Y
N
N
N
vPMC support
Y
Y
Y
N
N
N
Serial ports
32
4
4
4
4
4
Parallel ports
3
3
3
3
3
3
Floppy devices
2
2
2
2
2
2      


Raporları oluşturmak için Flex üzerindeki master server'a PuTTY üzerinden appadmin ile giriş yapın ve "sudo -i" ile root kulla...