NetBackup etiketine sahip kayıtlar gösteriliyor. Tüm kayıtları göster

7 Kasım 2025 Cuma

NetBackup | Capacity Report

Raporları oluşturmak için Flex üzerindeki master server'a PuTTY üzerinden appadmin ile giriş yapın ve "sudo -i" ile root kullanıcısına geçiş yapın.

Aşağıdaki ekran çıktısında göreceğiniz komutu çalıştırarak "kapasite" temelli kullanım raporunu oluşturabilirsiniz.

Turuncu renkle gösterilen girişleri elle yaptıktan sonra MS Excel formatında oluşacak rapor dosyası bulunduğu dizinden (yeşil renkle gösterildi) sistem dışına çıkartılabilir.


CPU socket bazlı lisansların kapsadığı kısmı görebilmek için "socket" bazlı kullanım raporunu da aşağıdaki şekilde oluşturuyoruz.

Gerekirse, aşağıdaki satırı /usr/openv/db/data/instance/postgresql.auto.conf içine ekledikten sonra instance'ı stop/start edin.

dynamic_shared_memory_type = 'mmap'
 
nbdeployutil aracını yeniden çalıştırın.

2 Nisan 2025 Çarşamba

NetBackup | Register OpsCenter

NetBackup master sunucusunu OpsCenter sistemine register etmek için aşağıdaki komutu kullanabiliriz.

nbregopsc -add <Name of the OpsCenter Server> 

D:\Program Files\Veritas\NetBackup\bin\admincmd>nbregopsc.exe

ERROR: No options selected

Usage: nbregopsc [-help]

[-addnb <OpsCenter server name>] Registers NetBackup with the specified OpsCenter server
[-addopscenter <OpsCenter server name>] Registers the OpsCenter server with NetBackup
[-add <OpsCenter server name>] Performs both -addnb and -addopscenter
[-preferred_network <OpsCenter server IP Address>] Optional OpsCenter server IP (applicable only for -add and -addnb)

10 Ekim 2024 Perşembe

NetBackup | MS SQL Server instances disappear from SQL Intelligent Policy

Problem

MS SQL Server instances disappear from SQL Intelligent Policy and previously discovered Availability Groups (AG) in NetBackup.

Cause

There is a mismatch in the following values:

- The output of the query SELECT @@SERVERNAME from SQL Management Studio.

- The Value in the Windows Registry under \HKEY_LOCAL_MACHINE\SOFTWARE\Microsoft\Microsoft SQL Server\X\Machines\OriginalMachineName 

Discovering AGs and instances involves both non-credential discovery and credential discovery. When NetBackup is not authenticated to connect to the SQL server, OriginalMachineName from the Windows Registry is collected by non-credential discovery as a source of the information for AGs or instances. Once connected, the information obtained from SQL Server will also be used. The conflict between these pieces of information will lead to a cycle of source information changing, which results in the issue of the AGs disappearing from NetBackup. 

This mismatch could be attributed to multiple factors. One to be considered is the cloning and deploying of VMs containing previously configured SQL Servers.

Solution

  • Compare the following values in the client. 

           The output of the query SELECT @@SERVERNAME from SQL Management Studio.

           The Value from the Registry under \HKEY_LOCAL_MACHINE\SOFTWARE\Microsoft\Microsoft SQL Server\X\Machines\OriginalMachineName 

           If the values above do not match, then rename one of those to make them match based on the preferred naming convention used in your organization. 

  • Restart NetBackup Services on the SQL client. 

  • Register Instance Name using the same name selected for the Registry keys 

https://www.veritas.com/content/support/en_US/article.100067428

13 Haziran 2023 Salı

NetBackup / Database Manager service: Access is denied. (5)

NetBackup Master Server işletim sistemini Windows 2012'den Windows 2022'ye upgrade ettikten sonra NetBackup Admin Console çalışmasına rağmen backup alınamıyor, farklı hatalar veriyor.

Cannot initiate NetBackup bpdbm. Terminating.

The NetBackup Request Daemon service terminated with the following service-specific error: 

Attempt to use a file handle to an open disk partition for an operation other than raw disk I/O.

NetBackup Snapshot client not licensed.

Bprd hizmeti başlamıyor ve aşağıdaki hatayı gösteriyor:

15:00:40.134 [9400.12584] <4> bprd: VERBOSE changing from 0 to 5
15:00:40.134 [9400.12584] <2> bprd: Created terminate event:"Global\NetBackup Terminate Event, pid: 9400"
15:00:40.134 [9400.12584] <2> bprd: Created suspend event:"Global\NetBackup Suspend Event, pid: 9400"
15:00:40.134 [9400.12584] <2> bprd: INITIATING bprd (VERBOSE = 5): NetBackup 10.1.1 2022121007 on masterserver_name
15:00:40.134 [9400.12584] <2> bprd: Now initializing logging for libcorbaobj
15:00:40.134 [9400.12584] <2> bprd: the request timeout value is 300 seconds
15:00:40.134 [9400.12584] <2> bprd: commandline: "D:\Program Files\Veritas\NetBackup\bin\bprd.exe"
15:00:40.149 [9400.12584] <2> bprd: initiate dbm daemon...
15:00:40.149 [9400.12584] <2> db_dbm_initiate: Could not start the NetBackup Database Manager service: Access is denied. (5)
15:00:40.149 [9400.12584] <2> bprd: cannot start database daemon...exiting
--------------------

NetBackup hizmetlerini durdurduk ve hizmet kullanıcısını Local System ile oturum açılması için düzenledik.

D:\Program Files\Veritas\NetBackup\bin\goodies>nbserviceusercmd.exe -changeUser LocalSystem

NOTE:
- The NetBackup services must be stopped before changing the service user.

Do you want to proceed? (y/n): y

Preparing the list of files and folders, this may take some time.
Revoking permissions for NetBackup services on the following file(s)/folder(s):
D:\Program Files\Veritas\

Revoking permissions on NetBackup registry keys.
Setting 'NT AUTHORITY\SYSTEM' as 'log on as' account for all non-privileged services.
Saving 'NT AUTHORITY\SYSTEM' as service user in the NetBackup configuration.

The service user is successfully changed.

NOTE:
- Start the NetBackup services.
- It may take up to 10 minutes to get the updated value of service user in host DB.
- It is recommended that you take catalog backup immediately.

D:\Program Files\Veritas\NetBackup\bin\goodies>

26 Mart 2023 Pazar

NetBackup / Registering NB with OpsCenter

bash-4.2# pwd

/usr/openv/netbackup/bin/admincmd

bash-4.2# ./nbregopsc -addopscenter servername

Registering opscenter (opscenter servername) with NB

Successfully registered

Registering NB with opscenter (opscenter servername)

Successfully registered


4 Ocak 2023 Çarşamba

NetBackup / How to silence the Disk Alarm on a NetBackup Appliance

How to silence the Disk Alarm on a NetBackup Appliance

Problem
The NetBackup Appliances will sound an audible alarm when a hard drive failure is detected.

Cause
This alarm is controlled by the RAID card installed on the Appliance.

Solution
First verify what is causing the Alarm:
 # /opt/MegaRAID/MegaCli/MegaCli64 -AdpGetProp AlarmDsply -aall

The Alarm can then be silenced with this command: 
# /opt/MegaRAID/MegaCli/MegaCli64 -AdpSetProp AlarmSilence -aall

If desired the Alarm can be disabled completely with:
# /opt/MegaRAID/MegaCli/MegaCli64 -AdpSetProp AlarmDsbl –aall
 
To enable the alarm again: 
# /opt/MegaRAID/MegaCli/MegaCli64 -AdpSetProp  AlarmEnbl –aall

2 Ağustos 2022 Salı

NetBackup / SAP Oracle Backup

SAP Oracle backup için backint ve .utl dosyalarını düzenleyebiliriz.

Symbolic link oluşturma:
ln -s /usr/openv/netbackup/bin/backint /sapmnt/SID/exe/uc/linuxx86_64/backint


Utl File:
/usr/openv/netbackup/ext/db_ext/sap/scripts/sap_oracle/initSAP.utl dosyasını düzenleyerek yeni .utl dosyası oluşturuyoruz.

/oracle/SID/sapprof/initSID.utl dosyasını güncelleyebiliriz.

8 Mart 2022 Salı

Configuring SAP HANA Instance for redirected restore

  1. Kaynak sisteminin backup politikasında, Clients listesine hedef sistemi de eklemeliyiz.

  2. Hedef sistemde /usr/openv/netbackup/ext/db_ext/sap altında node_names.txt dosyası oluşturularak kaynak sistem adını girmeliyiz.

  3. Hedef sistemde .utl file oluşturup, backup politika adını kaynak sistem backup politikası ile aynı yapmalıyız.

  4. SAP HANA ekranlarında hedef sistem üzerinde yeni olulturduğumuz .utl dosyasını kullarak restore işlemi yapabiliriz.

28 Ekim 2021 Perşembe

NetBackup / EMC DataDomain Configuration over FC

NetBackup ile EMC DataDomain FC entegrasyonu öncesinde OST plugin kurulumu yapıyoruz.

EMC DataDomain ile NetBackup arasında fiber bağlantıları yapıyoruz. 

SAN SW üzerinde alias zone tanımlarını yapıyoruz.

EMC DataDomain üzerinde fiber tanımlarını acces grup ayarlarınıyapıyoruz.


EMC DataDomain üzerinde fc ismini kontrol etmek için aşağıdaki komutu çalıştırabiliriz.

sysadmin@dd1# ddboost fc dfc-server-name show
DDBoost dfc-server-name: dd1
Configure clients to use "DFC-dd1" for DDBoost FC.

8 Ekim 2021 Cuma

NetBackup / testpassphrase

NetBackup passphrase parolasını admincmd altında aşağıdaki şekilde kontrol edebiliriz.

\admincmd>nbhostidentity -testpassphrase -infile C:\NB_Catalog\1633681347_FULL.drpkg

Specify the passphrase that is associated with the disaster recovery package.

Passphrase: **********

The specified passphrase is valid for the disaster recovery package - C:\NB_Catalog\1633681347_FULL.drpkg.

Command is successfully carried out.

1 Ekim 2021 Cuma

NetBackup / Rredirect the Accelerator track log to a different location

When performing an Accelerator enabled backup, track logs are created on the NetBackup client systems.

These track logs can be found at the following locations:

Windows: install_path\NetBackup\track

Under this directory, there will be a number of directories created that correspond to the master server name, storage server name, policy name, client name, and backup selections

Redirect the new backups to the new destination

1. Launch the registry editor by clicking Start > Run and then type in regedit

2. Use the tree control on the left hand side to navigate to the following location: HKEY_LOCAL_MACHINE\SOFTWARE\Veritas\NetBackup\CurrentVersion\Paths

3. Add a new registry entry:

a. Right click on Paths.

b. Select New > String Value.

c. Change New Value to TRACK_JOURNAL_PATH

d. Right click on TRACK_JOURNAL_PATH and select Modify...

e. Enter E:${_ps}track in the Value data: field.

Note: Be very careful to use the path separator variable '${_ps}' for each backslash (\) character in the path.

f. Select OK to save the change to the registry

https://www.veritas.com/content/support/en_US/article.100038114

9 Eylül 2021 Perşembe

NetBackup / vxupdate

Use the nbrepo command line to add packages to the repository

Download the files with the desired NetBackup client version (nbclient_version) and operating system (operatingsystem). The files to dowload will be named in the following format:

vxupdate_nbclient_version_operatingsystem_platform.sja

Once downloaded, place this in a directory on the master server, for example:
/tmp
C:\temp

The packages can then be added to the repository with the command:

Windows master:
<install_path>\Veritas\NetBackup\bin\admincmd\nbrepo.exe -a C:\temp\vxupdate_nbclient_version_operatingsystem_platform.sja

UNIX/Linux master:
# /usr/openv/netbackup/bin/admincmd/nbrepo -a /tmp/vxupdate_nbclient_version_operatingsystem_platform.sja

Use the following command to confirm the package has been added to the repository:
Windows master:  <install>\Veritas\NetBackup\bin\admincmd\nbrepo -l

UNIX/Linux master:  /usr/openv/netbackup/bin/admincmd/nbrepo -l

---------------------------------------------------------------------

C:\Program Files\Veritas\NetBackup\bin\admincmd>nbrepo.exe -a C:\temp\vxupdate_nb_9.1.0.1_windows_x64.sja
Adding package to the repository. This may take a few minutes...
Successfully added deployment package ID: 1 to the repository.

C:\Program Files\Veritas\NetBackup\bin\admincmd>nbrepo.exe -l
ID Type          Version OS          File Name
-- ------------- ------- ----------- -----------------------------------
1  server+client 9.1.0.1 windows_x64 vxupdate_nb_9.1.0.1_windows_x64.sja


3 Eylül 2021 Cuma

NetBackup / SLP

How to get details of all SLP versions?

(for UNIX) /usr/openv/netbackup/bin/admincmd
(for Windows)  \Netbackup\bin\admincmd

nbstl -L -all_versions

How to display one specific SLP's versions ( where SLP3 below is the name of the SLP )

nbstl SLP3 -L -all_versions

How to delete one specific version of SLP's ( where SLP3 below is the name of the SLP, 3 is version )

nbstl SLP3 -delete -version 3

24 Şubat 2021 Çarşamba

NetBackup / bptestbpcd

NetBackup master sunucu ile client bağlatı durumunu kontrol etmek için admincmd altında aşağıdaki komutu çalıştırabilirz.

 Program Files\Veritas\NetBackup\bin\admincmd>bptestbpcd.exe -client client-name -debug -verbose

3 Şubat 2021 Çarşamba

NetBackup / Registering authorized locations used by a NetBackup database script-based policy

Status Code: (5449) The script is not approved for execution.

To add an authorized location

  1. Open a command prompt on the client.
  2. Use nbsetconfig to enter values for an authorized location. The client privileged user must run these commands.
On UNIX, to update the bp.conf file:
# /usr/openv/netbackup/bin/nbsetconfig
nbsetconfig>DB_SCRIPT_PATH = /Oracle/scripts
nbsetconfig>DB_SCRIPT_PATH = /db/Oracle/scripts/full_backup.sh
nbsetconfig>
<ctrl-D>
 
On Windows, to update the registry with a new "String Value" Registry entry:
C:\Program Files\Veritas\NetBackup\bin>nbsetconfig
nbsetconfig>DB_SCRIPT_PATH=c:\db_scripts
nbsetconfig>DB_SCRIPT_PATH=e:\oracle\fullbackup\full_rman.sh
nbsetconfig>
<Ctrl+Z> and ENTER


26 Kasım 2020 Perşembe

NetBackup / Deleting an OpenStorage storage server

To delete an OpenStorage storage server

  1. In the NetBackup Administration Console, in the left pane, expand Media and Device Management > Credentials > Storage Servers
  2. Select the storage server that you want to delete.
  3. On the Edit menu, select Delete.
  4. Click Yes in the confirmation dialog box.
  5. On the NetBackup master server, use the following command to delete the storage server from the NetBackup EMM database:

Linux: /usr/openv/netbackup/bin/admincmd/nbemmcmd -deletehost -machinename storage_server_name -machinetype ndmp

Windows: install_path\NetBackup\bin\admincmd\nbemmcmd -deletehost -machinename storage_server_name -machinetype ndmp

https://www.veritas.com/support/en_US/doc/59118460-127355792-0/v15150143-127355792


28 Şubat 2020 Cuma

NetBackup / SAP HANA Backup

NetBackup Client
Linux sistemleri 8.2 versiyon için NetBackup_8.2_CLIENTS2.tar.gz ile kurulum yapıyoruz

tar -xzvf NetBackup_8.2_CLIENTS2.tar.gz
Backup Politikası
NetBackup üzerinde Policy type SAP olarak yeni politika oluşturuyoruz

.utl File

SAP HANA script
/usr/openv/netbackup/ext/db_ext/sap/scripts/sap_oracle/initSAP.utl

dosyasını düzenleyerek yeni .utl dosyası oluşturuyoruz

Yeni .utl dosyasını /hana/shared/SID/global/hdb/backint altına kopyalanabiliriz
SAP HANA Studio
SAP HANA Studio ekranlarında .utl dosyalarını backup tanımları için kullanıyoruz
Symbolic link
/hana/shared/SID/global/hdb/opt altında link oluşturuyoruz

ln -s /usr/openv/netbackup/bin/hdbbackint_script /hana/shared/SID/global/hdb/opt/hdbbackint


25 Şubat 2020 Salı

NetBackup / 5240 Appliance disk drive configuration

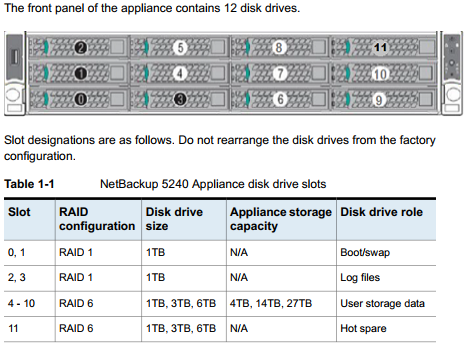
NetBackup 5240 Appliance contains 12 SAS hard disk drives. 

The appliance uses the disk drive that is located in slot 11 as a hot-spare disk. 

If one of the disk drives fails in slots 4 through 10, the appliance automatically initiates a RAID 6 rebuild operation. It rebuilds the RAID 6 array by using the hot-spare disk drive in slot 11. 

After you replace the failed disk drive, the appliance then copies the information from the disk drive in slot 11 to the new replacement disk. 

When the copy operation finishes, the disk drive in slot 11 again becomes the hot-spare disk.


22 Kasım 2019 Cuma

NetBackup / To verify NetBackup daemons or services on linux

/usr/openv/netbackup/bin/bpps -x

servername:/usr/openv/netbackup/bin # /usr/openv/netbackup/bin/bpps -x
NB Processes
------------
root      72130      1  0 15:53 ?        00:00:00 /usr/openv/netbackup/bin/vnetd -proxy inbound_proxy -number 0
root      72131      1  0 15:53 ?        00:00:00 /usr/openv/netbackup/bin/vnetd -proxy outbound_proxy -number 0
root      72187      1  0 15:53 ?        00:00:00 /usr/openv/netbackup/bin/vnetd -standalone
root      72192      1  0 15:53 ?        00:00:00 /usr/openv/netbackup/bin/bpcd -standalone
root      72277      1  0 15:53 ?        00:00:00 /usr/openv/netbackup/bin/nbdisco


Shared Veritas Processes
-------------------------
root      67572      1  0 15:34 ?        00:00:00 /opt/VRTSpbx/bin/pbx_exchange
servername:/usr/openv/netbackup/bin #

21 Kasım 2019 Perşembe

VMware/ Disable VSS application quiescing using VMware Tools

  1. Open the C:\ProgramData\VMware\VMware Tools\Tools.conf file using a text editor.
  2. Create the file if it does not exist in the above said location
  3. Add these entries to the file:

    [vmbackup]
    vss.disableAppQuiescing = true

     
  4. Save and close the file.
  5. Restart the VMware Tools Service.
    1. Click Start > Run, type services.msc, and click OK.
    2. Right-click the VMware Tools Service and click Restart.

Raporları oluşturmak için Flex üzerindeki master server'a PuTTY üzerinden appadmin ile giriş yapın ve "sudo -i" ile root kulla...