7 Kasım 2025 Cuma

NetBackup | Capacity Report

Raporları oluşturmak için Flex üzerindeki master server'a PuTTY üzerinden appadmin ile giriş yapın ve "sudo -i" ile root kullanıcısına geçiş yapın.

Aşağıdaki ekran çıktısında göreceğiniz komutu çalıştırarak "kapasite" temelli kullanım raporunu oluşturabilirsiniz.

Turuncu renkle gösterilen girişleri elle yaptıktan sonra MS Excel formatında oluşacak rapor dosyası bulunduğu dizinden (yeşil renkle gösterildi) sistem dışına çıkartılabilir.


CPU socket bazlı lisansların kapsadığı kısmı görebilmek için "socket" bazlı kullanım raporunu da aşağıdaki şekilde oluşturuyoruz.

Gerekirse, aşağıdaki satırı /usr/openv/db/data/instance/postgresql.auto.conf içine ekledikten sonra instance'ı stop/start edin.

dynamic_shared_memory_type = 'mmap'
 
nbdeployutil aracını yeniden çalıştırın.

2 Ekim 2025 Perşembe

Windows | Reset lost administrator password

Windows Server 2022 çalışan bir sistemde, unutulan lokal admin parolasını resetlemek için aşağıdaki adımları uygulayabiliriz.

Windows Server 2022 kurulum medyası ile sistemi boot

Repair moddan Command Prompt çalıştırarak aşağıdaki adımları uyguluyoruz

Güvenli modda sistemi açıyoruz

Easy of access ikonuna basarak cmd ekranında düşüyoruz. 

Buradan net use komutları ile parola resetleme vb. işlemleri yapabiliriz


8 Mayıs 2025 Perşembe

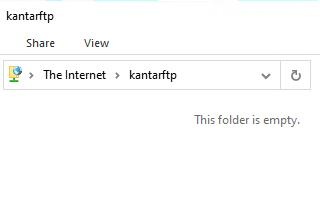
FTP Server | This folder is empty

Windows Server IIS üzerinden hizmet veren bir FTP servisine erişmek istediğimizde; 

Internet Explorer, FileZilla vb. uygulamalar ile erişim sağlanabiliyor fakat Windows Explorer ile kontrol edildiğinde "This folder is empty" mesajı ile karşılaşabiliriz.

Sorunun kaynağı, ftp erişim için kullanılan kullanıcı parolasındaki özel karakterler olabilir. Farklı bir parola vererek erişimi kontrol edebiliriz.


2 Nisan 2025 Çarşamba

NetBackup | Register OpsCenter

NetBackup master sunucusunu OpsCenter sistemine register etmek için aşağıdaki komutu kullanabiliriz.

nbregopsc -add <Name of the OpsCenter Server> 

D:\Program Files\Veritas\NetBackup\bin\admincmd>nbregopsc.exe

ERROR: No options selected

Usage: nbregopsc [-help]

[-addnb <OpsCenter server name>] Registers NetBackup with the specified OpsCenter server
[-addopscenter <OpsCenter server name>] Registers the OpsCenter server with NetBackup
[-add <OpsCenter server name>] Performs both -addnb and -addopscenter
[-preferred_network <OpsCenter server IP Address>] Optional OpsCenter server IP (applicable only for -add and -addnb)

10 Ekim 2024 Perşembe

NetBackup | MS SQL Server instances disappear from SQL Intelligent Policy

Problem

MS SQL Server instances disappear from SQL Intelligent Policy and previously discovered Availability Groups (AG) in NetBackup.

Cause

There is a mismatch in the following values:

- The output of the query SELECT @@SERVERNAME from SQL Management Studio.

- The Value in the Windows Registry under \HKEY_LOCAL_MACHINE\SOFTWARE\Microsoft\Microsoft SQL Server\X\Machines\OriginalMachineName 

Discovering AGs and instances involves both non-credential discovery and credential discovery. When NetBackup is not authenticated to connect to the SQL server, OriginalMachineName from the Windows Registry is collected by non-credential discovery as a source of the information for AGs or instances. Once connected, the information obtained from SQL Server will also be used. The conflict between these pieces of information will lead to a cycle of source information changing, which results in the issue of the AGs disappearing from NetBackup. 

This mismatch could be attributed to multiple factors. One to be considered is the cloning and deploying of VMs containing previously configured SQL Servers.

Solution

  • Compare the following values in the client. 

           The output of the query SELECT @@SERVERNAME from SQL Management Studio.

           The Value from the Registry under \HKEY_LOCAL_MACHINE\SOFTWARE\Microsoft\Microsoft SQL Server\X\Machines\OriginalMachineName 

           If the values above do not match, then rename one of those to make them match based on the preferred naming convention used in your organization. 

  • Restart NetBackup Services on the SQL client. 

  • Register Instance Name using the same name selected for the Registry keys 

https://www.veritas.com/content/support/en_US/article.100067428

26 Eylül 2024 Perşembe

How to Uninstall SafeNet Authentication Service Agent

SafeNet Authentication Service Agent uygulamasını kaldırılması gerektiğinde aşağıdaki yöntemi kullanabiliriz.

SafeNet Authentication Service Agent'ı kaldırmak için aşağıdaki komutu kullan: 


msiexec /x {PRODUCT-CODE} 


{PRODUCT-CODE} kısmına SafeNet Authentication Service Agent'ın ürün kodunu yazmalısın. Ürün kodunu bulmak için kayıt defterine bakabilirsin:


regedit (Kayıt Defteri Düzenleyicisi) aç.
HKEY_LOCAL_MACHINE\SOFTWARE\Microsoft\Windows\CurrentVersion\Uninstall yolunu takip et.
Burada SafeNet Authentication Service Agent ile ilgili anahtarı bul ve ürün kodunu kopyala.


Örnek: msiexec /x {523727B0-D5D5-4392-935B-BFEAA70F29A6}

24 Mayıs 2024 Cuma

HSM Komutlar

hsmstate              HSM sistemlerin durumları

ctkmu l                HSM üzerindeki slotlar

ctconf -v -a0     a0 sisteminin bilgileri

ctconf -v -a1     a1 sisteminin bilgileri

ctkmu l -s11        slot11 içeriği


HSM sisteminde slot oluşturma, initialize işlemi ve replikasyonu

1. to create new slot on a1:  ctconf -c1 -a1

2. to initialize the slot:      ctkmu t -s<slot number>

3. to replicate:                 ctkmu rt –s<source> –d<destination>


HSM sisteminde fw update

ctconf -g   621-000097-003_PSIE2_V5.00.02.fw     örnek fw dosya adı

https://thalesdocs.com/gphsm/ptk/5.9/docs/Content/PTK-C_Admin/CLI_Ref/cmd_line_util_ref.htm

9 Aralık 2023 Cumartesi

VMware / Reset ESXi Root Password with Host Profile

1. Login to the vCenter WebClient

2. Go to Home and then choose Host Profiles from Operations and Policies Section.

3. Choose > Extract profile from a host.

4. In the Extract Host Profile menu wizard > Select the host you want to update the password for.

5. Name the Host Profile and click Next and then Finish to complete the capture of the host profile template.

 - The new host profile should appear on the Host Profile Objects Field.


6. Right Click the new Host Profile or using the Actions menu choose > Edit Settings

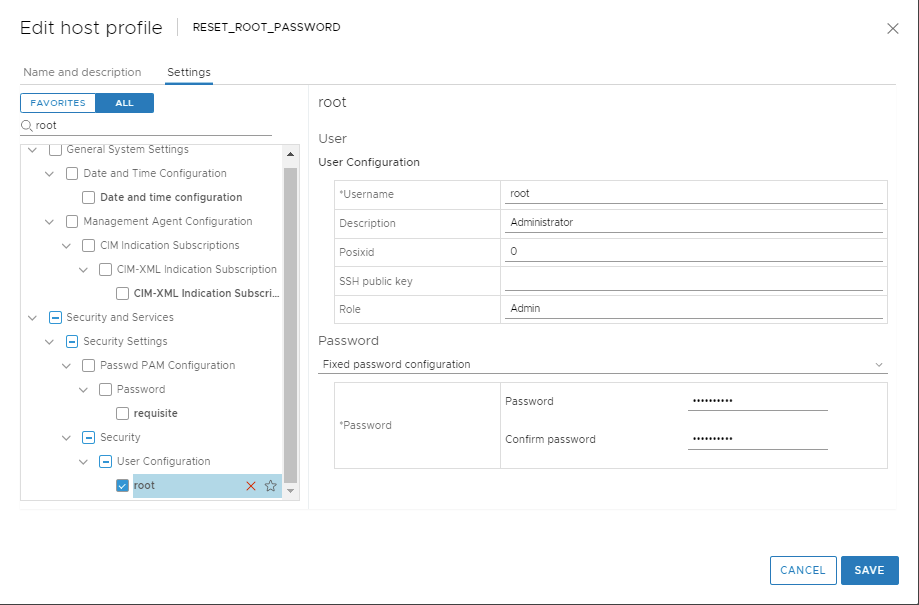
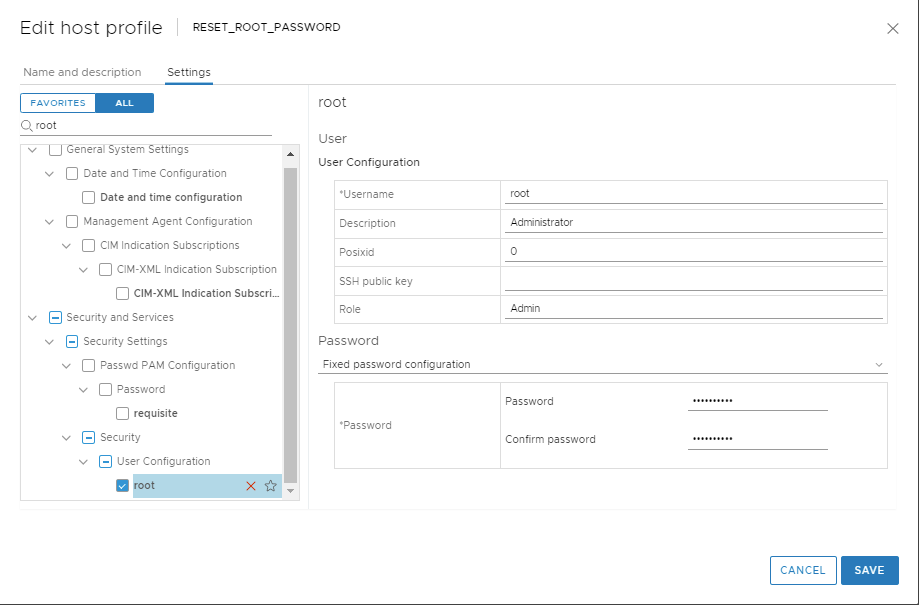
7. In the 'Edit Host Profile' Wizard. Uncheck all boxes.

8. Then using the search filter search for > root

9. Highlight and then select the check box for > root

10. A configurable window will display the root User configuration.

11. At the Password subsection, choose > Fixed password configuration

12. Here you will fill in the new password and confirm it before proceeding.

13. Double check that all other non applicable boxes have no check marks and proceed to Finish .

14. Once the Task Completes highlight the new host profile and from the 'Actions' drop down menu choose > Attach Detach Hosts and Clusters > then Select the host in the wizard.

15. From the Action Menu select Check Host Compliance.

16.  From the Action Menu select Remediate

17. Then Check Host Compliance.

18. Remove the Host Profile from the Host.

- At this time the host password should be successfully upgraded.

https://kb.vmware.com/s/article/68079

VMware / vmfsfilelockinfo

VMware üzerinde lock durumda olan bir sanal makine ya da dosyanın hangi host üzerinde lock durumda olduğunu ve detaylarını aşağıdaki örnek komut ile sorgulayabiliriz.

[root@esxihost:~] vmfsfilelockinfo -p "/vmfs/volumes/ESXI05/VMware vCenter Server 20395099/VMware vCenter Server 20395099.vmx.lck"

vmfsfilelockinfo Version 2.0

Looking for lock owners on "VMware vCenter Server 20395099.vmx.lck"

"VMware vCenter Server 20395099.vmx.lck" is locked in Exclusive mode by host having mac address ['6c:0b:84:b7:f6                                 :e2']

Trying to use information from VMFS Heartbeat


Host owning the lock on file is 92.68.10.26, lockMode : Exclusive

Total time taken : 5.400021321999986 seconds.

12 Eylül 2023 Salı

How to Uninstall McAfee DLP Endpoint

PsExec uygulaması ile McAfee DLP Endpoint kaldırılması.
  1. PsExec uygualaması
  1. Registry Uninstall yolundaki McAfee DLP Endpoint UninstallString değeri
PsExec.exe -s -i cmd
Registry içerisindeki McAfee DLP UninstallString değeri


HKEY_LOCAL_MACHINE\SOFTWARE\Microsoft\Windows\CurrentVersion\Uninstall

Altında McAfee DLP uygulaması bilgilerinden UninstallString değeri

13 Haziran 2023 Salı

NetBackup / Database Manager service: Access is denied. (5)

NetBackup Master Server işletim sistemini Windows 2012'den Windows 2022'ye upgrade ettikten sonra NetBackup Admin Console çalışmasına rağmen backup alınamıyor, farklı hatalar veriyor.

Cannot initiate NetBackup bpdbm. Terminating.

The NetBackup Request Daemon service terminated with the following service-specific error: 

Attempt to use a file handle to an open disk partition for an operation other than raw disk I/O.

NetBackup Snapshot client not licensed.

Bprd hizmeti başlamıyor ve aşağıdaki hatayı gösteriyor:

15:00:40.134 [9400.12584] <4> bprd: VERBOSE changing from 0 to 5
15:00:40.134 [9400.12584] <2> bprd: Created terminate event:"Global\NetBackup Terminate Event, pid: 9400"
15:00:40.134 [9400.12584] <2> bprd: Created suspend event:"Global\NetBackup Suspend Event, pid: 9400"
15:00:40.134 [9400.12584] <2> bprd: INITIATING bprd (VERBOSE = 5): NetBackup 10.1.1 2022121007 on masterserver_name
15:00:40.134 [9400.12584] <2> bprd: Now initializing logging for libcorbaobj
15:00:40.134 [9400.12584] <2> bprd: the request timeout value is 300 seconds
15:00:40.134 [9400.12584] <2> bprd: commandline: "D:\Program Files\Veritas\NetBackup\bin\bprd.exe"
15:00:40.149 [9400.12584] <2> bprd: initiate dbm daemon...
15:00:40.149 [9400.12584] <2> db_dbm_initiate: Could not start the NetBackup Database Manager service: Access is denied. (5)
15:00:40.149 [9400.12584] <2> bprd: cannot start database daemon...exiting
--------------------

NetBackup hizmetlerini durdurduk ve hizmet kullanıcısını Local System ile oturum açılması için düzenledik.

D:\Program Files\Veritas\NetBackup\bin\goodies>nbserviceusercmd.exe -changeUser LocalSystem

NOTE:
- The NetBackup services must be stopped before changing the service user.

Do you want to proceed? (y/n): y

Preparing the list of files and folders, this may take some time.
Revoking permissions for NetBackup services on the following file(s)/folder(s):
D:\Program Files\Veritas\

Revoking permissions on NetBackup registry keys.
Setting 'NT AUTHORITY\SYSTEM' as 'log on as' account for all non-privileged services.
Saving 'NT AUTHORITY\SYSTEM' as service user in the NetBackup configuration.

The service user is successfully changed.

NOTE:
- Start the NetBackup services.
- It may take up to 10 minutes to get the updated value of service user in host DB.
- It is recommended that you take catalog backup immediately.

D:\Program Files\Veritas\NetBackup\bin\goodies>

26 Mart 2023 Pazar

NetBackup / Registering NB with OpsCenter

bash-4.2# pwd

/usr/openv/netbackup/bin/admincmd

bash-4.2# ./nbregopsc -addopscenter servername

Registering opscenter (opscenter servername) with NB

Successfully registered

Registering NB with opscenter (opscenter servername)

Successfully registered


9 Mart 2023 Perşembe

Active Directory / Get-ADUser

Kullanıcıdan SID sorgulama:

Get-ADUser -Identity ad_user | Select-Object -Property Name,SID

SID'den Kullanıcı Sorgulama:

Get-ADUser -Filter * | Select-Object -Property SID,Name | Where-Object -Property SID -like "*-6677"


27 Şubat 2023 Pazartesi

Windows / How to change password in RDP session

How to change password in RDP session
  • Start osk.exe
  • Hold Ctrl + Alt on your physical keyboard, then click on the del key in the on screen keyboard.
  • Minimize the On-Screen Keyboard
  • Click Change a password.

4 Ocak 2023 Çarşamba

NetBackup / How to silence the Disk Alarm on a NetBackup Appliance

How to silence the Disk Alarm on a NetBackup Appliance

Problem
The NetBackup Appliances will sound an audible alarm when a hard drive failure is detected.

Cause
This alarm is controlled by the RAID card installed on the Appliance.

Solution
First verify what is causing the Alarm:
 # /opt/MegaRAID/MegaCli/MegaCli64 -AdpGetProp AlarmDsply -aall

The Alarm can then be silenced with this command: 
# /opt/MegaRAID/MegaCli/MegaCli64 -AdpSetProp AlarmSilence -aall

If desired the Alarm can be disabled completely with:
# /opt/MegaRAID/MegaCli/MegaCli64 -AdpSetProp AlarmDsbl –aall
 
To enable the alarm again: 
# /opt/MegaRAID/MegaCli/MegaCli64 -AdpSetProp  AlarmEnbl –aall

19 Ekim 2022 Çarşamba

VMware / msg.snapshot.error-NOTFOUND

 Sanal makine üzerinde snapshot alınmak istediğinde aşağıdaki hata ile karşılaşılabilir.

Bu durumda sanal makinenin bulunduğu klasör içerisindeki dosyalar kontrol edilebilir. 
Varsa delta isminde dosyalar silinerek snapshot alınma sorunu çözülebilir.

An error occurred while taking a snapshot: msg.snapshot.error-NOTFOUND.
An error occurred while saving a snapshot: msg.snapshot.error-NOTFOUND.


2 Ağustos 2022 Salı

NetBackup / SAP Oracle Backup

SAP Oracle backup için backint ve .utl dosyalarını düzenleyebiliriz.

Symbolic link oluşturma:
ln -s /usr/openv/netbackup/bin/backint /sapmnt/SID/exe/uc/linuxx86_64/backint


Utl File:
/usr/openv/netbackup/ext/db_ext/sap/scripts/sap_oracle/initSAP.utl dosyasını düzenleyerek yeni .utl dosyası oluşturuyoruz.

/oracle/SID/sapprof/initSID.utl dosyasını güncelleyebiliriz.

8 Mart 2022 Salı

Configuring SAP HANA Instance for redirected restore

  1. Kaynak sisteminin backup politikasında, Clients listesine hedef sistemi de eklemeliyiz.

  2. Hedef sistemde /usr/openv/netbackup/ext/db_ext/sap altında node_names.txt dosyası oluşturularak kaynak sistem adını girmeliyiz.

  3. Hedef sistemde .utl file oluşturup, backup politika adını kaynak sistem backup politikası ile aynı yapmalıyız.

  4. SAP HANA ekranlarında hedef sistem üzerinde yeni olulturduğumuz .utl dosyasını kullarak restore işlemi yapabiliriz.

1 Mart 2022 Salı

Desktop Central Agent - Konfigurasyon Update Kontrol

Uzak sistemde, powershell ile Desktop Central Agent konfigurasyon kontrol işlemini aşağıdaki şekilde yapabiliriz.

PS C:\Windows> Enter-PSSession hostname

[hostname]: PS C:\Users\username\Documents> cd 'C:\Program Files (x86)\DesktopCentral_Agent\bin'

[hostname]: PS C:\Program Files (x86)\DesktopCentral_Agent\bin> .\cfgUpdate.exe

Loadlibrary succeeded 

GetProcaddress succeeded 

Notification is succeeded

Configuration is in Progress...

[hostname]: PS C:\Program Files (x86)\DesktopCentral_Agent\bin> Exit-PSSession

PS C:\Windows> 

Raporları oluşturmak için Flex üzerindeki master server'a PuTTY üzerinden appadmin ile giriş yapın ve "sudo -i" ile root kulla...